Pre-wedding photography is all about capturing love stories in breathtaking locations. But what happens when a couple dreams of having seven different locations in just one day? That’s exactly what Fian and Fany wanted for their pre-wedding shoot in Singapore—a challenge that felt like a mission impossible! From sunrise to nightfall, we raced against time, changing outfits, battling unpredictable weather, and navigating through Singapore’s traffic. Here’s the behind-the-scenes story of how we pulled off this ambitious and unforgettable shoot!
Disclaimer: From the selected spots, some will use the same concept and outfit, so it will reducing preparation time. Several factors need to be considered, including the distance between locations and the duration of the photoshoot at each spot. On this trip, there are four locations where the shooting process takes less than 30 minutes. Read the blog about choosing a pre-wedding photoshoot destination. https://www.danielalvinaphoto.com/blog/Tips-for-Choosing-Your-Pre-Wedding-Destination-in-Bali-or-Singapore/
Fian & Fany, a lovely couple from Bangka, Indonesia, had planned a family vacation to Singapore and Malaysia. While organizing their trip, they decided to make the most of their time by having a pre-wedding photoshoot in Singapore. After discussing their vision and expectations with our team, they trusted us to capture their love story in one of the most vibrant cities in Asia. Initially, we recommended choosing five locations to ensure a smooth and enjoyable session. However, after careful planning, we realized we could squeeze in six iconic spots! Planning a pre-wedding photoshoot in Singapore requires precision, especially when moving between multiple locations in a single day.
To ensure a smooth and efficient session, we created a detailed schedule for Fian & Fany, complete with an MRT route to navigate the city effortlessly. And, of course, when exhaustion kicked in—Grab car to the rescue!
04.00 - 06.00 Makup & hairdo at V Hotel Lavender
Grab car to Parliament House Car Park
06.30 - 08.30 Singapore National Gallery
North South Line (NSL) - City Hall to Dhoby Ghaut
09.00 - 10.30 Fort Canning Tree Tunnel
North South Line (NSL) - Dhoby Ghaut to Marina Bay
11.30 - 13.30 Marina One
Thomson-East Coast Line (TEL) - Marina Bay to Garden by the Bay
14.00 - 16.00 Cloud Forest
Walk / Grab Car to Marina Barrage
17.30 - 19.00 Marina Barrage
Circle Line (CCL) - Garden by the Bay to Bayfront
21.00 - 22.30 Helix Bridge
1. SINGAPORE NATIONAL GALLERY
On this trip, our team consisted of three people: Daniel as the photographer and videographer, Alvina as the makeup artist, and Yumi as the hairstylist. Alvina and Yumi completed their tasks right on time at 6 AM, while Daniel headed straight to the location at the same time. As expected, February is the rainy season, and that day was no exception. It rained heavily, and the sun only started to peek out around 7:30 AM. We had to wait for more than an hour until the rain eased and the sunlight finally appeared. Our first photoshoot location was the National Museum. However, things didn’t go exactly as planned—the National Museum only opened at 10 AM. While waiting, we took some photos outside the building. Then, we came up with a spontaneous idea to capture some shots near Merlion Park, with a stunning view of Marina Bay Sands.


2. JUBILEE BRIDGE, MARINA BAY VIEW
We took a 10-minute walk to Jubilee Bridge, once we arrived, we quickly started our photoshoot. light rain suddenly started to fall. Since we didn’t want to risk getting our equipment wet, we wrapped up the session after just 10 minutes. Just before 10 AM, we returned to the National Museum and entered the building. Unexpectedly, taking photos inside required a fee of SGD $180 for 2 hours, and prior approval via email from the management was needed. Our team was quite shocked because the last time we did a pre-wedding shoot here, it was free—though wearing a white gown was prohibited, as it was considered a wedding event. This experience serves as an important reminder for us to always check the latest regulations for photoshoot locations in the future! Since we were already satisfied with the shots taken outside and had an unplanned yet beautiful spot earlier, we decided to move on to our next destination (which unexpectedly became our third spot of the day).


3. Fort Canning Tree Tunnel
Since the rain was still falling and we found a nearby bus stop, we decided to take a city bus to our next location—Fort Canning Tree Tunnel.

As expected, Fort Canning Tree Tunnel remains one of the most iconic and Instagrammable spots in Singapore, especially among tourists. And today was no exception. When we arrived, there was already a long queue, and we had to wait for about 30 minutes for our turn to take photos.
Despite the wait, the spot was definitely worth it!
Note: If you're someone who pays attention to details, it's important to understand the editing limitations that you can request from your photographer. Common retouching options include: color adjustments, blemish removal (e.g., acne, scars), body slimming (if requested), Fixing wrinkled outfits, removing unwanted distractions (photobombers). Locations like Fort Canning, Cloud Forest, and Marina Barrage are popular tourist spots, meaning there will often be people in the background of your photos. This makes post-processing crucial to achieving clean and polished final images.
To see the difference editing can make, check out these before & after examples: https://danielalvinaphoto.pixieset.com/beforeafter/


4. Cloud FOReST
By the time we wrapped up our photoshoot at Fort Canning Tree Tunnel, it was already 12:30 PM. We decided to head back to our team’s hotel in Orchard for a quick retouch session. To save time, we also ordered one of Singapore’s most famous dishes—Lucky Plaza’s Hainan Chicken Rice—to enjoy at the hotel.
After finishing the retouch and meal, it was already 2:30 PM, meaning we were more than three hours behind schedule! Alvina quickly put together an emergency schedule to get us back on track. swapping Marina One with Cloud Forest as the next location. This adjustment made sense because the transition from Marina One to Marina Barrage wouldn't require change outfit—the next spot still matched the previous outfit.
Note: Having a moodboard as a reference for the concept, outfits, makeup, and hairstyles is crucial. It helps keep everything organized and ensures a smooth workflow, even when unexpected schedule changes happen. Trusting an experienced team to handle adjustments will also help you stay calm and focused during the shoot.
Emergency schedule
14.30 - 15.30 Cloud Forest
16.00 - 17.30 Marina One
18.00 - 20.00 Marina Barrage
21.00 - 23.00 Helix Bridge
To speed things up, we booked a Grab car and headed straight to our next destination: Cloud Forest at Gardens by the Bay.


5. Marina ONE
After finishing our photoshoot at Cloud Forest, we headed to the public restroom at Gardens by the Bay for a quick outfit change. At the same time, we restyled the model’s hair into a ponytail to match the upcoming sessions at Marina One and Marina Barrage. To save time, we booked a Grab car to Marina One, where we captured some shots for about 15 minutes. Despite the short session, we managed to make the most of the location and get some great shots before moving on to the next destination.


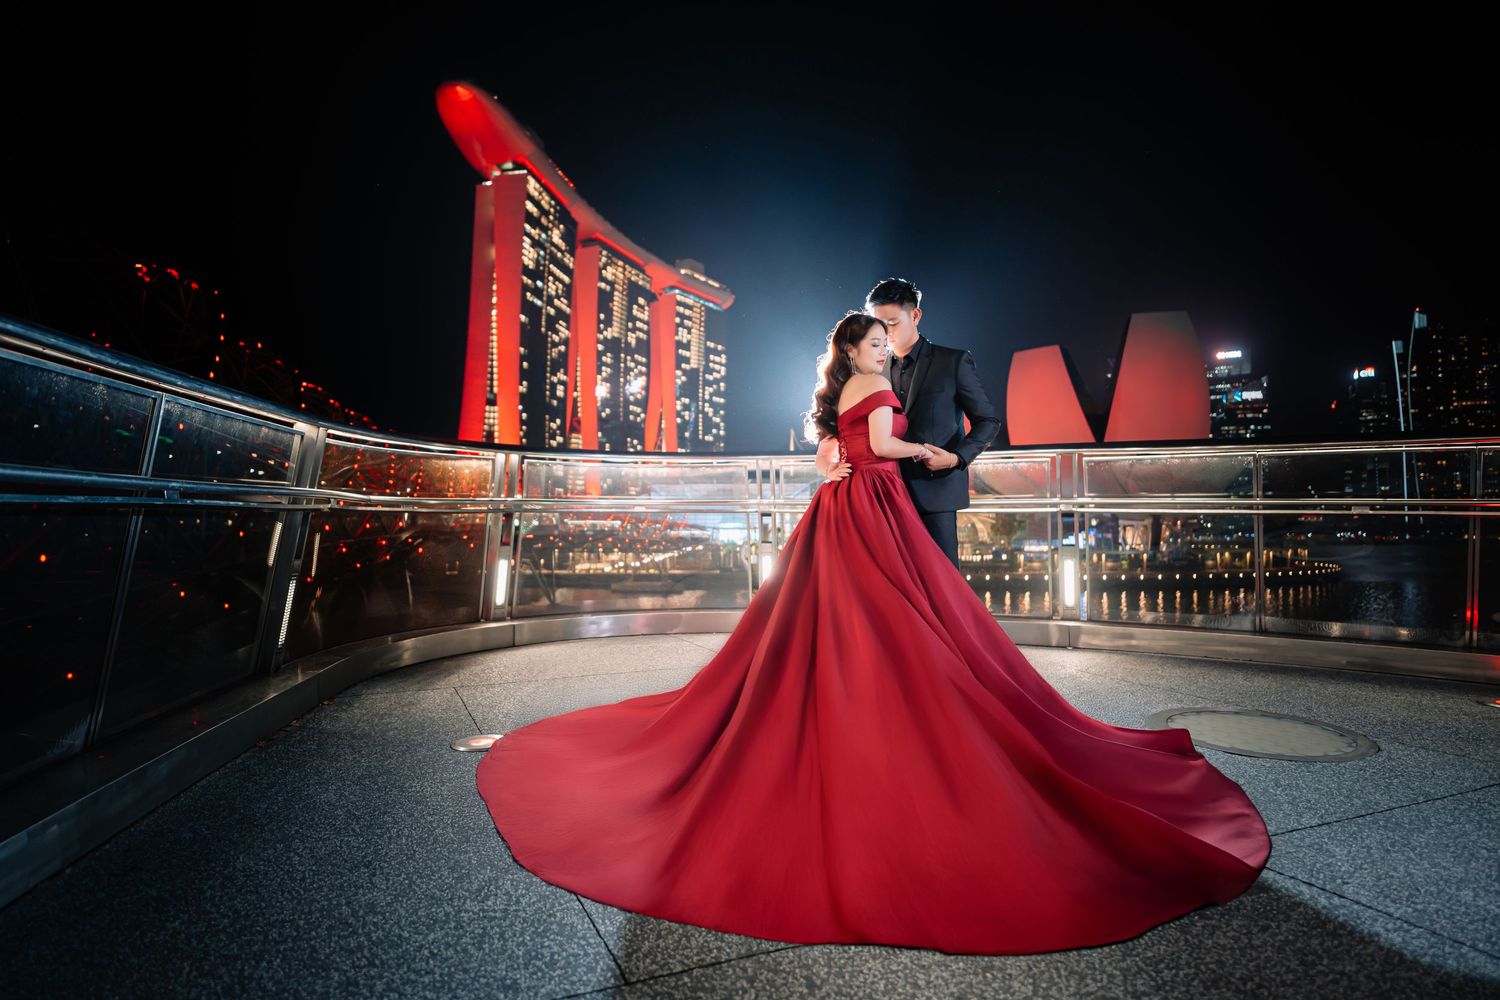
6. Marina BARRAGE
Marina Barrage is one of the most popular spots for pre-wedding photoshoots in Singapore, and it was no exception for Fian and Fany. This location offers a stunning city skyline view, featuring the iconic Singapore Flyer and Marina Bay Sands in the background.
One of the best things about Marina Barrage is that it allows us to shoot from afternoon until blue hour, when the city lights start to illuminate the skyline. This transition creates a magical atmosphere, making it an ideal spot for capturing both natural and city-lit romance in a single session.


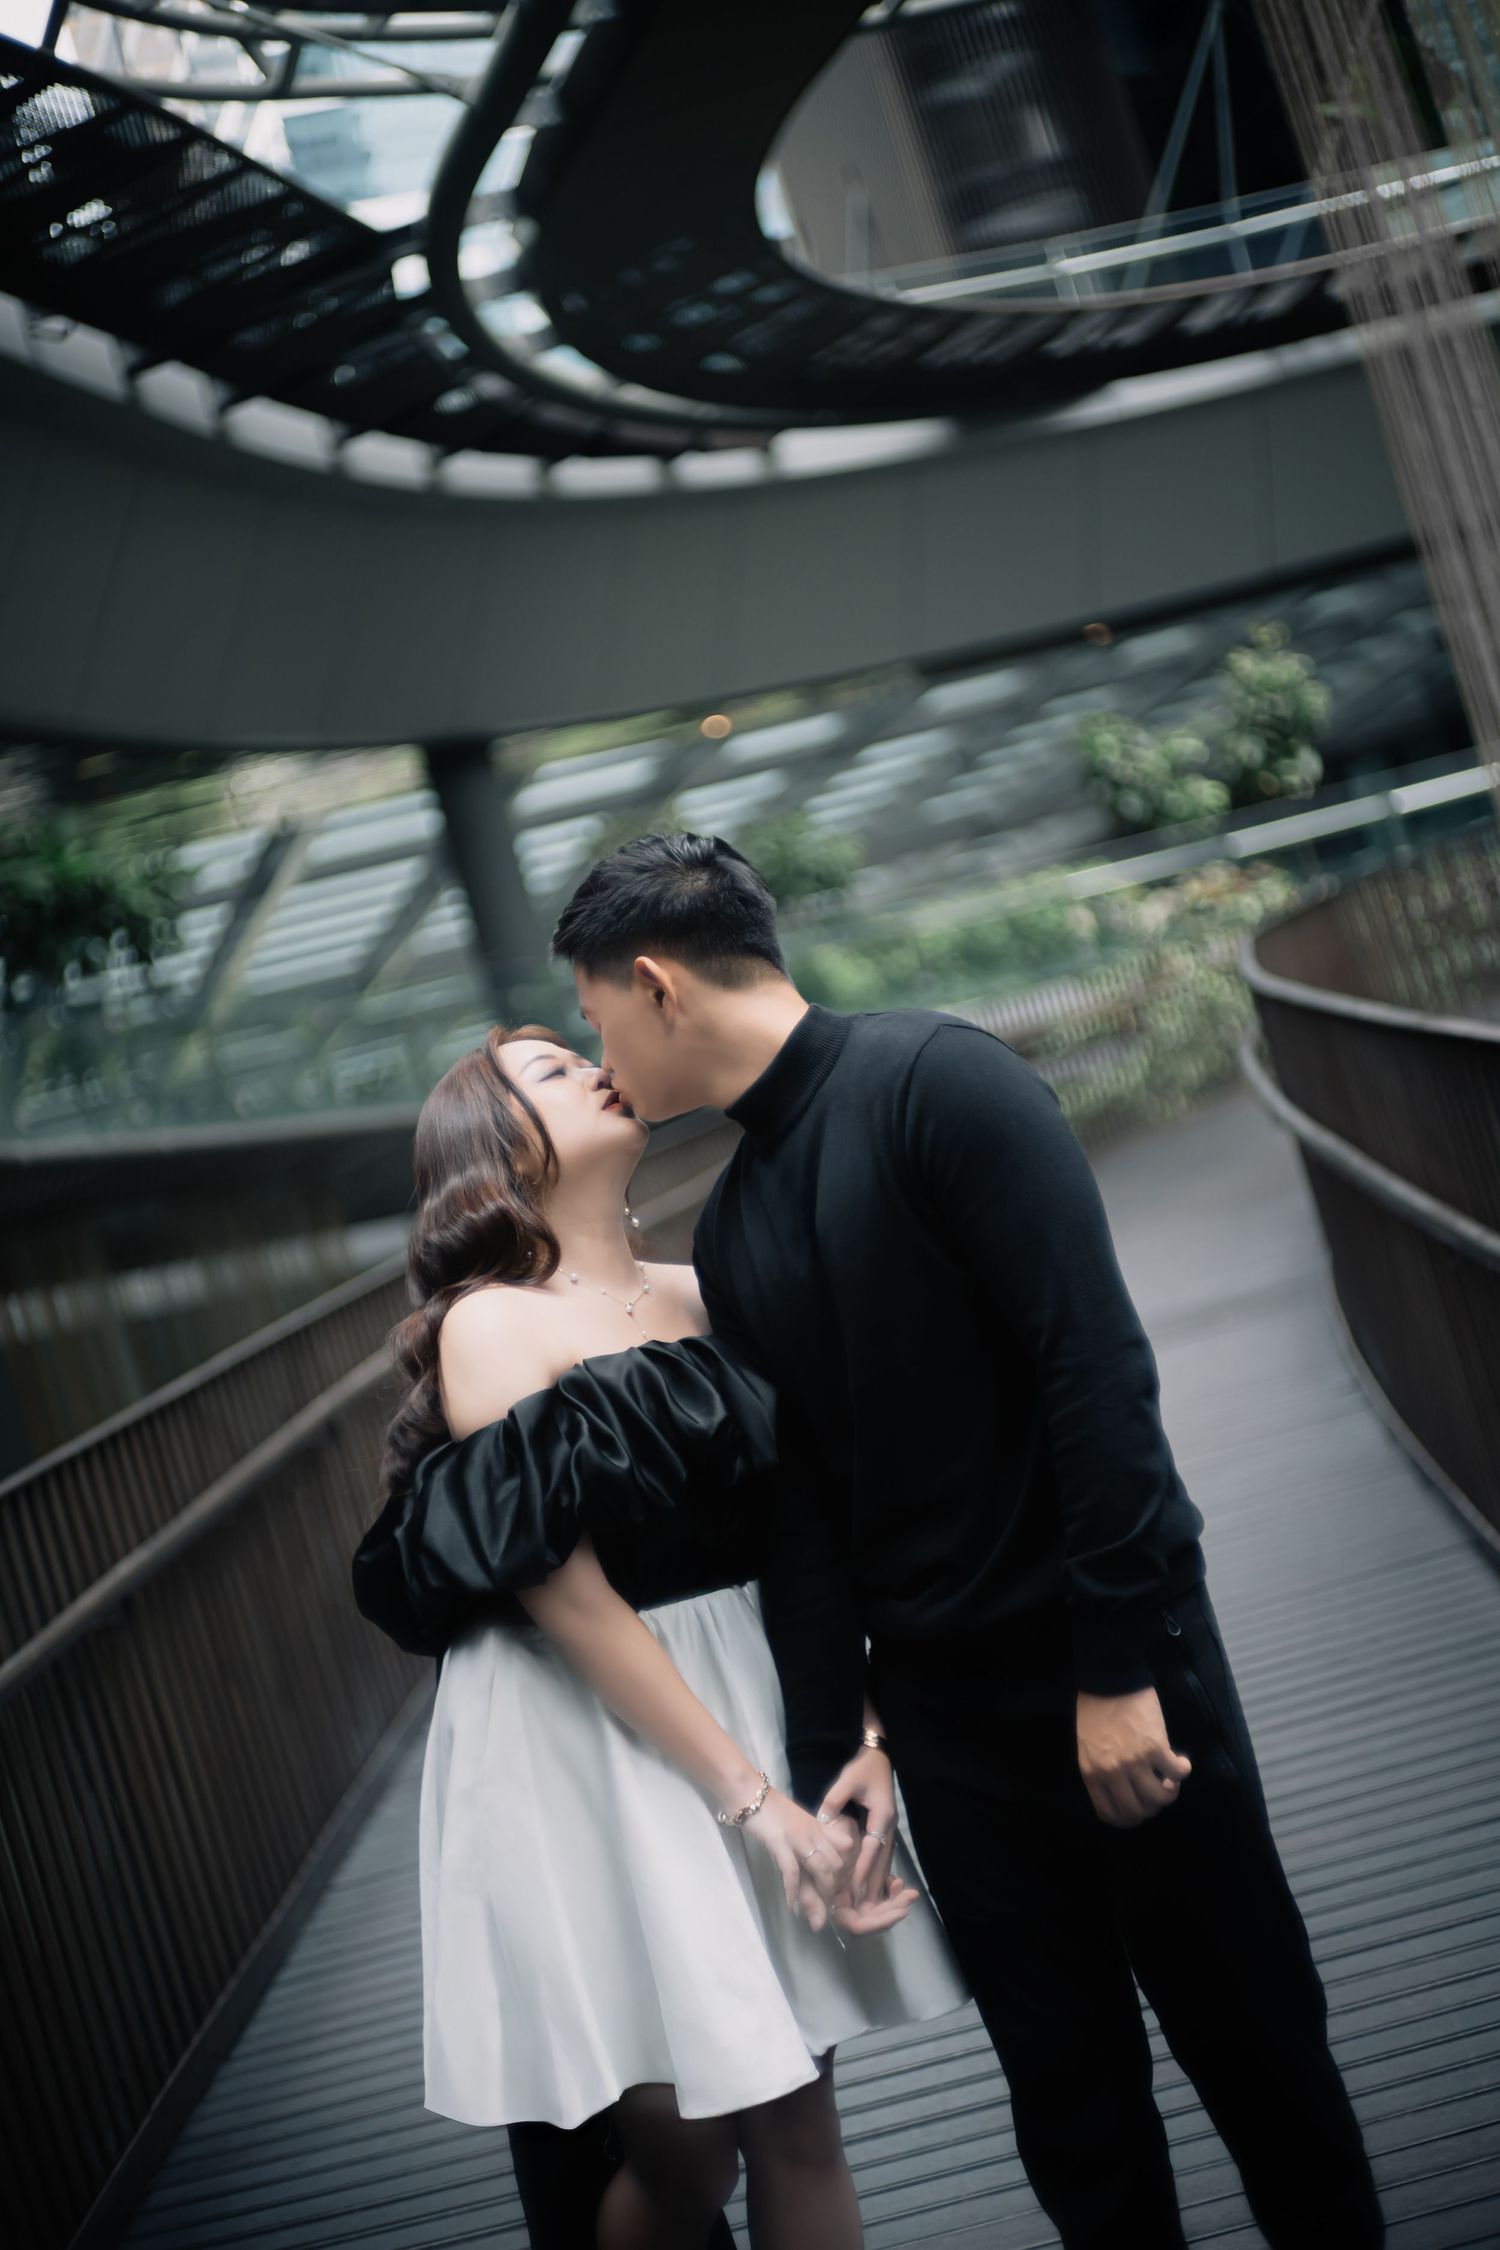
7. HELIX BRIDGE
Around 7:30 PM, we wrapped up our session at Marina Barrage and decided to head back to our hotel in Lavender for a quick retouch and dinner. After a long day of shooting, exhaustion was starting to set in, but we had one final location left—Helix Bridge.
To save energy, we booked a Grab car to Youth Olympic Park, which is the closest drop-off point to Helix Bridge. However, things didn’t go as smoothly as expected. Our Grab driver started complaining because stopping at that location wasn’t allowed. This was surprising since we had always used this drop-off point in previous sessions without any issues. Maybe we just got unlucky this time!
Note for next time: To avoid any trouble, it might be safer to get dropped off at Marina Bay Sands Casino and walk to Helix Bridge—even though it's a bit farther, it ensures a smoother arrival.
Once we reached Helix Bridge, we spent around 30 minutes capturing our final shots, making the most of the stunning night lights and futuristic architecture. With that, we officially wrapped up this pre-wedding photoshoot!

